vimtronner: A Multiplayer, Command-line vim Trainer Built on Node.js and Socket.io

Greetings, programs! Meet vimtronner, a multiplayer command-line game that teaches you the core vim keys. Be the last player alive by either controlling your bike safely around obstacles or building your own walls for your opponents to crash into. Just remember: you can’t do both at the same time!
You can learn how to install and play vimtronner on its Github page as well as check out its codebase. In this post we’ll walk through it’s origins and lessons learned about terminal graphics, handling input for games, efficiently routing events to interested parties and more. tldr »
Inspirations and Origins
One of the best things about working at Carbon Five is a culture that encourages continual learning and provides opportunities to do so. Aside from sponsoring academic courses and trips to conferences, we hold a monthly in-house Project Day (that leads into our open-house Hack Nights in SF and LA). It’s a chance for us to try out new technology, build up internal systems, write blog posts, whatever. The only requirement is we share our learnings at the end of the day.
The week before each Project Day we supply a virtual sticky board (via our own stickies.io app) and hold a brown-bag where we pitch project ideas, whether ongoing or new. It was at one of these sessions where vimtronner was first suggested.
An obvious source of inspiration was of course this movie moment:

But a more recent one was vimsnake by Pat Moody. It took the classic game of Snake (or Nibbles for QBasic veterans) and combined it with the constraints of vim. Namely that you should navigate with the home-row keys of h, j, k, and l (left, down, up, and right respectively). Additionally, you could only change your direction when you are not in INSERT mode. Of course, you have to enter INSERT mode in order to do anything of value in both the game and vim!
We took the same mechanics, but made three changes. First, we would be INSERTing walls. Second, we wanted to make it multiplayer. Finally, challenged by one of our hack night attendees Dave Taylor, we decided not to make it a HTML5 canvas game but build an actual command-line app.
Early Technology Decisions
Up front we decided to go with Node.js, for a number of reasons. For one thing, some of us had not worked with the framework yet and sought an opportunity to do so. Node.js also provided a great balance between the kind of performant platform needed by games and an “easy to start being productive” environment desired by developers.
Then there is the ease of using Socket.IO with Node.js. In truth, we didn’t really think about any other networking framework. There are plenty of online examples of creating multi-user apps with Socet.IO, and we already had in-house experience doing so. And while most of these examples are in the context of in-browser JavaScript, the socket.io-client module provides the exact same interface for Node.js environments.
We also used Mocha as our testing framework and wrote our source code in CoffeeScript. However, we would revisit the latter decision when it came time for users to actually run the app.
Guided by the Game Loop
Like all games, the core of vimtronner is the ‘game loop’.
- Gather Input from players.
- Simulate the world, resolving collisions and effects.
- Finally, Render the results to the players.
This loops continually executes until the game is over. In our case, this is handled through the obvious use of JavaScript’s setInterval within our Game model:
In building out the game, we used the loop to guide our efforts. Now, given the loop is a series of steps, one would assume we would start with the first of gathering input.
However, being hackers fed on a healthy diet of 80s movies, we instead leapt into the shiny Step 3; GRAPHICS!
Rendering ANSI and UTF-8 Graphics on the Command-Line
The question was how to make interesting graphics in the command-line? There are actually a number of Node.js modules available to answer this question. Some are based on the popular curses library. Others supplied the same interface as a HTML5 canvas object. We really felt we had to figure it out for ourselves as many of these libraries were geared towards using basic, blocky characters.
We knew there were are possibilities open, as can be seen by the output of using Homebrew:
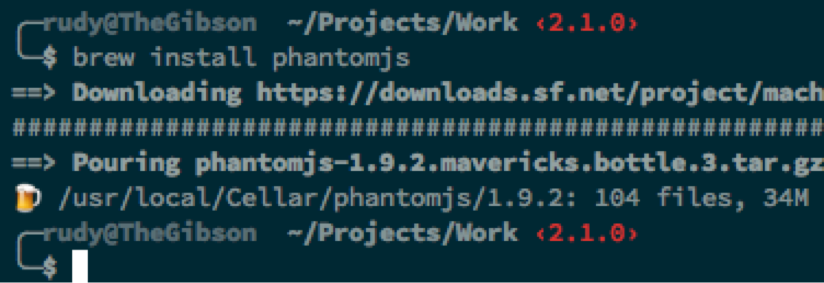
How did they output that mug of beer? The answer was obviously by using the extended UTF-8 character set. Instead of the typical characters, we can output a series of bytes and have them coalesce into a single glyph.
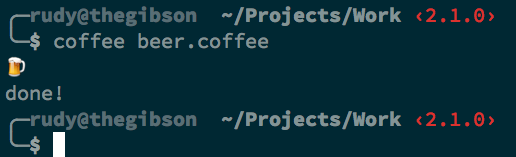
In Node.js, a byte sequence can be represented by a Buffer, initialized upfront with a fixed size. We wrapped it in buffer method to ease initialization.
We would then use the function as follows:
Running the above results in the following output:
With special characters under our belt, we moved on to the problem of placing those characters at specific locations. This is really easy to do badly. For example, we could blindly print out enough blank spaces before a character to ensure it ends up in the right place:
But toss in multiple characters, borders, texts, etc. and calculating the spaces between it all is a waste of computational time and resources. Luckily, the terminal comes with a solution already in place: the ANSI escape code.
The emission of the escape code ("\x1b" as a string) is a message to the terminal that the next set of characters are instructions to manipulate the output. As can be seen by the documentation on Wikipedia, these instructions can change colors, reposition the cursor, or even completely clear the scene. We wrapped this functionality in a screen module, sampled below:
The main takeaway of both these techniques is to remember the standard output of a program does not simply echo whatever you send down the pipe straight to a screen. Emitted bytes can trigger behavior like special characters or changing colors.
Having all the components necessary to create a rich graphical experience (for the command-line), we then returned to the first step of the loop; gathering input!
Taking Control to Give Control
Capturing input from a keyboard SHOULD not be complicated. In Node.js, you listen to data events on the standard input stream. However, there are major problems for games, as illustrated by this code:
Running the above, we get this output:
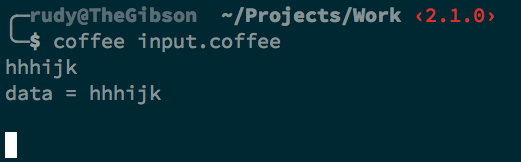
As you type, standard input is ECHOED immediately to standard output. Also, the data event is only triggered when you hit carriage return. Both of these were show stoppers for the game we were building. We couldn’t have random is, js, and other characters appearing onscreen mid-game and ask players to repeatedly hit ENTER!
Additionally, by default, the input stream is PAUSED and waits until your program relinquishes control before sending back events.
The solution to all these issues was this code:
From the top, we set standard input to raw mode, preventing the echoing and skipping the carriage return. We then call resume to un-pause the input and receive it immediately. Finally, we listen to the data events, expecting to receive one character at a time.
Modeling and Multi-playing
The “final” loop step to implement was simulating the world, first without multiplayer.
We could now go into detail of how we did this but, while it was fun to do, there was nothing special here outside from standard modeling practice. The first version of vimtronner looked something like this:
Likewise, we won’t go deep on the building of the multi-player client and server. As mentioned previously, this has been covered ad nauseam online. There is one detail we do want to callout.
The server needs to handle multiple games at the same time, keeping in memory a map of their names to their running instances from which it easily adds and retrieves them from:
Likewise, through a Socket.IO instance, the server have access to the connected clients. A basic reading of Socket.IO tells us we can either emit events to single socket or broadcast to ALL of them. But it would be a waste of time to update EVERY socket with the events of EVERY game when each client is only interested in ONE game at a time. How then do we emit updates of a game to only those clients interested in it?
Socket.IO provides a third-way; the concept of rooms. When a client connects to a game, they join a room with the game’s name, as can be seen in the initialization code of our wrapping ClientGameSocket class:
Then, when a game emits an update to the server hosting it, the server only relays the update to the sockets in the game’s room:
The rest of the implementation is the standard emitting and handling events that socket-based solutions usually follow.
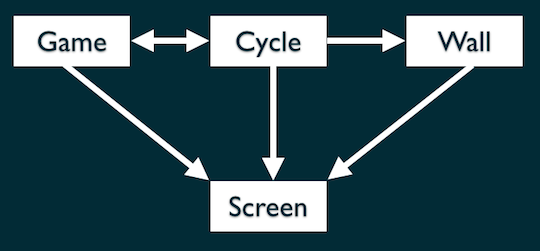
When we wrapped up the core of our application, though, we noticed something about the high-level view of its components. They could be easily grouped into three collections, each of which addressed one of the three steps of the game loop:

Deploying on Heroku
From the start, we wanted a public server to host games so that we could eventually introduce a scoreboard. For quite some time, the only hosting solutions that would allow for both Node.js support AND websockets were rolling your own or Node.js targeted startups like nodejitsu. We are fans of Heroku, though, and with their introduction of support for websockets last year (albeit as part of their experimental “labs” suite), we were excited to try it out. It was as easy as advertised with only one more step added to the typical Heroku app setup to activate websockets support:
$ heroku labs:enable websockets

Enabling websockets for boiling-bastion-2872... done

WARNING: This feature is experimental and may change or be removed without notice.
For more information see: https://devcenter.heroku.com/articles/heroku-labs-websockets
Publishing to the world
With the app working, it finally came time to distribute it. Easy installation was the goal; we wanted players to only have to type in vimtronner at the command-line to start a game. Node.js’ package management system npm made this a breeze.
Remember, every Node.js application is itself a module. Its package.json communicates not only its dependencies but can state what binary scripts to make available:
The script itself uses the interpreter directive (i.e. #! read as shebang) to tell the program launcher of the player’s system to run the script through Node.js. The script then immediately passes the command-line arguments it was launched with to vimtronner module itself:
With this all setup, we then published vimtronner through npm:
$ npm publish .
Anyone could then install vimtronner globally:
$ npm install -g vimtronner
Once done, they can launch vimtronner without having to explicitly call Node.js first:
$ vimtronner
Our “dream” had been realized!
Drink the CoffeeScript, But don’t Force Others to Do So
As mentioned before, the app is written in CoffeeScript. We originally even had the launch script invoke coffee as the interpreter. However, when testing the apps with players, this became another problem. It necessitated players not only had Node.js installed globally but also coffee. We just doubled the number of requirements and complexity of installation.
Also, having the published code in the module be in CoffeeScript requires it to be interpreted at runtime into JavaScript. It may not be a big performance hit, but it could have been easily avoided. Toss in the fact there are other community members who detest CoffeeScript as much as we love it and you some valid questions why are we using it in the first place.
Luckily, an acceptable pattern has emerged in the larger Node.js community. While the original source code of a module may be written in CoffeeScript, the PUBLISHED code that is EXECUTED should be JavaScript, avoiding the need to have a CoffeeScript interpreter at run-time. To accomplish this, we use grunt to compile the CoffeeScript in our src directory into the final JavaScript in our lib directory, which is what our package.json and launch script actually reference. You can check out our Gruntfile.js as a reference on how to do this.
Next Steps
Whew! As you can see, a lot of things went into this “simple” game. And we are by no means done. There are many things we would like to add including:
- A player identification and scoreboard system.
- Hardening of servers by setting time-limits on games, minimum numbers of players, and other requirements.
- AI bots to allow for a more interesting single-player game experience.
Personally, there are two areas I want to focus on:
- Dealing with the lag. Currently this is a two fold problem of games only being on one server on Heroku and us being unable to scale it up as all the games are held in memory. I have an idea for a redis based messaging system where different heroku dynos can be used to scale out more support for sockets and more support for games.
- Going functional. Internally, like the larger hacker community, we’ve had a lot of discussion on the merits of this direction. Games are sometimes seen as the ultimate example of an Object Oriented System with lots of mutable state. Articles like The Caves of Clojure show a path to a functional implementation. It’s all very exciting.
If you want to help out, in any way, please do so through the Github repo. File issues, submit pull requests, and send us your thoughts on our little project.
If there is any take away from this long post it is this: learn continuously. Push your colleagues, friends, family, and yourself to do so; and make it fun.
See you on The Grid!
tl;dr
- Install, play, and read the codebase of vimtronner.
- Standard output is not simply an echo service to the screen. It can be sent bytes that command it to output special characters (UTF-8) or manipulate colors and positions (ANSI escape code).
- Make standard input go raw and call
resumeon it to avoid waiting for carriage returns, catch every character and prevent echoing of input to the standard output. - Use Socket.IO rooms to route the events of a game to only those clients interested in it as opposed to blasting every connection.
- If you love CoffeeScript drink it, but don’t force others to do so; use grunt to compile it into the JavaScript you actually publish.
- Learn. Always. And make it fun.
Rudy Jahchan
Rudy’s fascination with computer programming began at age 10 when he mistakenly picked up the Micro-Adventure book Space Attack; he thought it was going to be about Star Wars. That happy accident led him to graduate from McGill University in Computer Science and start a 12 year career in software development playing with a wide range of technology; everything from web applications to cryptology to NoSQL.