Open Source 101: Be a Contributor
If you’ve spent anytime writing software, you’ve used an open source project. Open source projects save you time and energy by leveraging other people’s experience and hard work, leaving you free to focus on the core features of your project. Often people want to contribute to these projects, but don’t know where to start. They are afraid their contributions will be ignored or, worse yet, attacked. With tools like GitHub freely available for open source projects, anyone can become a contributor. If you follow a few simple steps, you can have a positive experience.
Getting Started
Well maintained open source projects continue to be improved because of the goodwill and hard work of their communities. An open source project is unlikely to have everything you need. Sometimes it will get you 90% of the way. Sometimes the documentation is missing or unclear. Sometimes you find a bug. This is where you can contribute.
Step one: pick a project
First, you need to choose a project. Ideally, this is a project that you have been actively using or are planning to use in the near future. But, beware, not all projects are created equal.
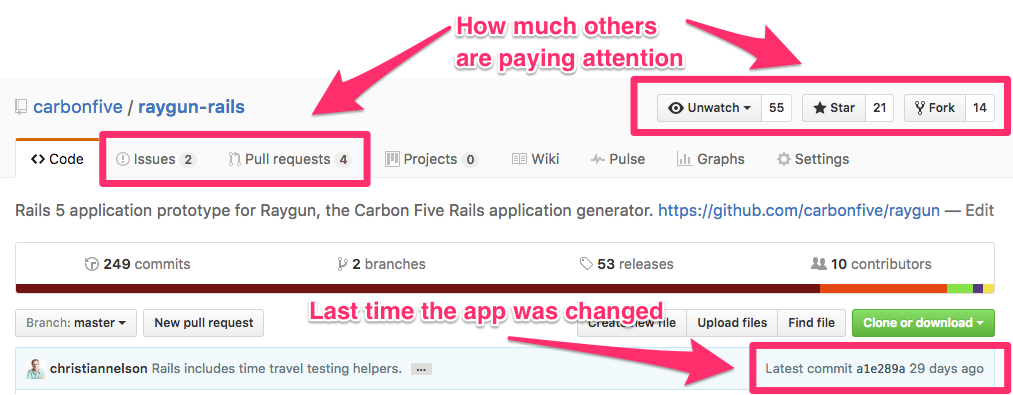
- When looking at a project on GitHub, look for the number of stars. This means people have at least marked it as a project to pay attention to.
- Next, look at when the last commit was made. If there hasn’t been a commit for some time, then the project is likely unmaintained and your contribution will not be acknowledged.
- Finally, look at the activity in both the Issues and Pull Request sections. How old are they? Are there active conversations? Do the maintainers…maintain?
Projects that meet these conditions will have a higher chance of accepting and benefiting from your contribution.
Step two: use, learn, understand
You’ve picked a project. Now get to know it. Use it. Read the documentation. Study the code. Search through the pull requests and issues. Remember, one or many people have taken the time to post their work publicly on the internet for everyone to see and use. Be kind and respect them by learning as much as you can before you tell them there is a problem or trying to change their work.
Step three: Give back
You’ve used the project. You’ve learned. You understand…mostly. Finally, step three! You get to give back. There are three common ways to contribute. In order of risk and difficulty you can open an issue, edit documentation, or write code.
Open an Issue
GitHub lumps bugs and feature requests into Issues. Developers welcome feedback on their projects and may not have used it in the same situation as you. If it doesn’t seem to solve your problem, you can suggest a change. Additionally, if you think you’ve found a bug, you can submit a detailed report. If the project is actively maintained, expect to receive a response within a few days.
Edit Documentation
Documentation comes in three primary forms:
- Written instructions: Written instructions are generally found in the README file at the root of the project. They explain how to set up the code, give some basic examples, and, if you’re lucky, link to more detailed api documentation. Fixing typos or formatting issues in these are a great way to give back. This is also a way for the project’s contributors get to know you and see that you have a desire to productively help out.
- Example code: The easiest way to learn about a project is to see it used in a real world scenario. By updating existing examples or adding new ones, you benefit the entire community.
- Tests: Tests fill a similar role as example code, but provide additional security for future project development.
Write Code
While bug reports and documentation are nice, what most people want is to write code and have it accepted into a project. Decide if you are fixing a bug or introducing a new feature. Avoid doing both in a single pull request – remember you can open more than one pull request and the smaller the pull request, the easier it is to review. Github makes this a very smooth process.
- Fork the repository on GitHub. This creates your own copy of the project under your GitHub user.
- Clone your forked repository to your machine and get the most recent version running. Make sure you can execute the tests, if there are any, and make sure you have a way to test your changes locally.
- Check for a Contributor’s guide. Larger projects tend to have guidelines for contributing. See an example here.
- Finally, create a new branch to do your work.
If you’re fixing a bug, write a failing test first. This will both validate that you understand the problem and can prove that your change fixes it. If you’re adding a feature, make sure you understand the philosophy of the project. Avoid introducing new dependencies or paradigms until you have actively contributed to the project and gotten to know the maintainers. As you make your changes, the most important thing is to verify that everything still works. Go back and make sure that you’ve followed the coding style of the project. Avoid drive-bys, that is, only make changes related to your bug or feature.
After you’ve verified your change works and updated or written the appropriate tests, it’s time to organize your work and present it to the world. GitHub, once again, smooths out this process through their Pull Request tool. Pull requests allow the maintainer of a project to pull code from your fork into their project. The community can see your changes and leave comments. This presentation by Justin Hileman gives some great info on making a pull request that is more likely to be accepted. The bottom line is a “Pretty Pull Requests Gets Merged First”. After you’ve submitted your pull request, be patient. Most times an open source project is a side project and the maintainer may not look at things right away. Once they do get back to you, be responsive to their comments and make changes as needed. If all goes well, your contribution will be immortalized in the annals of GitHub history.
Open source projects are a labor of love by people who have most likely never met in person. By making any of the aforementioned contributions you are making the project better for anyone that currently uses it or will use it in the future. So, I encourage you to take the risk and put yourself out there.
This is the first post in a series on Open Source. Stay tuned for Open Source 201: Putting Yourself Out There, which will cover open sourcing your first project.