
Safely Migrating from Paperclip to Active Storage
Active Storage was introduced into Rails version 5.2. It is a highly anticipated addition to handle integrations with asset management such as AWS S3. For a long time, the field has been dominated by outside gems, including Paperclip, which has been around longer than many people have been Rails developers. Now that Active Storage has been released, Paperclip is being deprecated, creating even more incentive to migrate if you weren’t already considering it.
I recently performed the migration from Paperclip to Active Storage on production. It felt a bit like transferring trains without stopping at a station. You’re setting up Active Storage, replacing the code, and performing a data migration that relies on the code you’re refactoring out from under you.
There is already a long migration guide. In this post I will cover the migration I made with an emphasis on how I tested the code along the way in order to feel confident in the switch and hopefully give you ideas for safely migrating your own code. The TLDR of the testing plan is as follows:
- Test that your data migration creates ActiveStorage records right after you write the migration.
- Test that your app works with local storage after you’ve converted the code.
- Test the AWS S3 (etc.) configuration with a sandboxed bucket just for your development environment.
- Test the data migration locally with sample data on local storage (optional).
- Test the data migration locally with acceptance or production data.
- Test on acceptance/staging with external APIs.
This post is a supplement to the migration guide, which you should still follow.
The migration guide first tells you to install active storage. This is basically running the migration Rails generates so that you can add Active Storage Active Record Objects. Active Storage introduces two Active Record objects: the “blobs”, which contain the metadata about the asset, and the “attachment”, which is essentially the join table between your models and the metadata “blobs”.

Then you’re supposed to create a data migration, which the Paperclip guide suggests as a Rails database migration. I took this out of a migration file and put it into a service class, eventually converting it to a rake task. The code did not work for me out of the box, and I needed the ability to run this on the command line to test it.
We have one internal app that tracks candidates, and since it’s a pretty basic case, I’m going to post it here with some comments for reference. It took a bit of Googling, issue posting, and so on before I was able to get the code working, and so I’ve annotated the code a bit more so you can more easily understand the use case. Essentially we have Candidates, and each candidate may have one resume.
1. Test that your data migration creates Active Storage records right after you write the migration
The above is the final, working form, but for intermediary steps, I got this data migration basically working. By basically working, I mean it didn’t error when I ran it (obviously) and when I looked at the console, I was able to type ActiveStorage::Blob.count and ActiveStorage::Attachment.count and get counts that a) reflects the number of Paperclip files (in my case sample data) and b) an equal number of blobs to attachments.
What you should be able to test so far:
- That you were able to create ActiveStorage::Blob and ActiveStorage::Attachment records.
You can’t yet test anything more substantial because the model associations aren’t in place and neither are the configurations or anything else useful.
This is where, no matter your git habits, I would commit what you’ve done so far as one singular commit, push up what you have, and switch to a new branch based off the current one. Further commits should stay separate from this one. This is the point at which I realized that I was transferring trains while both of them were still moving.
So, the data migration above depends on two things outside of the code written: 1) the association in the model, because it utilizes the candidate.resume relationship defined there, and by extension 2) the Paperclip gem which contains the model helper. For this app, which uses Heroku and deploys the code first, AND THEN runs the migrations, that means the data migration would be depending on code that wasn’t there. Realizing it would take two separate deploys** I switched to coding across two branches and that also made testing the migration much easier.
2. Test that your app works with local storage after you’ve converted the code.
So, forget about whether the migration works for right now, since you can’t test it anyway, and concentrate on getting your pre-existing code to work with local storage.
This is continuing to follow the Paperclip migration guide, which has a lot of suggested methods to change, and wants you to change code in your a) models, b) tests, c) views, d) controllers, and finally your configuration. I searched through the code to find the obvious traces of Paperclip. However, I definitely found a few gotchas that weren’t mentioned in the guide and were particular to our own code.
Running the app, for instance, I found that the filenames were no longer displaying. Looking at the source, I realized we were displaying the filename from:
candidate.resume_file_name
For a has_one association, Paperclip puts four columns on the model. As mentioned, Active Storage has a blob active record object with metadata and an attachment active record join. It displayed all the previous filenames, but not the uploaded ones since Active Storage didn’t add to that attribute. Not finding any immediate documentation on how to list filename in the new system, I guessed.
candidate.resume.filename
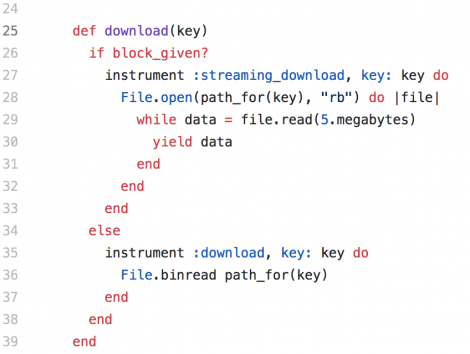
That worked! Below you’ll also note that this call does a bit more than get an attribute from a single Active Record model, it loads two additional records.

There are scopes to make this call more efficient. Use them if you need them.
What you should be able to test so far:
- Uploads, downloads, persistent data, should work as normal.
I had a few question marks at this point and I left them unanswered for a later part of the testing.
3. Test the AWS S3 (etc.) configuration with a sandboxed bucket just for your development environment.
The next thing I did was test the S3 integration. We have a different bucket for staging and production. I created a third bucket for development. This was our setup for Paperclip:
And here’s how it transferred to Active Storage.
One of the things I love about Active Storage is that it has a sense of environments. With Paperclip, we were using a dead simple local environment variable to specify whether we were using S3 or not, which was environment dependent. I was able to just blow away that code and live a happier life.
In most of the guides, I’ve been seeing Rails’s system of credentials displayed as the way to retrieve secrets and keys.
I found that a little buggy and our preferred method of storing secrets and keys is in the environment, as per the 12-factor app.
One of the things I had hoped to find out during this step was how to specify a path during upload. In Paperclip, I had code like this.
The path it specifies allows us to put the images in a neat and tidy file structure in S3. In Active Storage, I had code like in the second example.
But what about the rest of it!
Well, turns out there isn’t a way to specify path on upload quite yet. Active Storage has a JavaScript library that you can add on the front end. AND you can add it with yarn. This will handle the upload of files to S3.
However, the uploader doesn’t take any options and it places the files in the root directory with a random key as its name, while holding onto the file name in the blob record. There seemed to be a way to move files after they’re created, but not override the direct upload.
For our purposes, we didn’t need to keep our neat and tidy file structure, so we decided to just add all additional files to the root of the bucket and embrace the new tech.
What you should be able to test so far:
- Uploads, downloads, persistent data, should work as normal. But now with S3!
Save all the work you’ve done so far and commit it. At this point I squashed all the previous commits up until the data migration, which I kept separate. I left this branch as it was and returned back to the first branch. This allowed me to run the migration, cherry-pick the commit from branch 2, and see if it worked. When I failed to successfully migrate the data (like 20 times), I git reset —hard to just the migrations on the first branch and deleted all of the ActiveStorage::Blobs and ActiveStorage::Attachments on the console, then remigrated and cherry-picked the branch 2 commits. Rinse. Repeat.
4. Test the data migration locally with sample data on local storage (optional).
I started down the path of testing the data migration with sample data using Paperclip and came up against a wall. After taking some local data and “migrating” it, I realized it was giving me the wrong file path. By default, Active Storage stores in a storage/xM/RX/xMRXuT6nqpoiConJFQJFt6c9 file structure. By default, Paperclip stores in a public/system/users/avatars/000/000/004/original/the-mystery-of-life.png file structure.
Digging into the Active Storage code, I discovered I couldn’t just leave the file in place and have Active Storage find it. Active Storage builds the file path when using DiskService (the service that handles local storage), as opposed to storing it. Notice the folder_for method building the path to the file below.
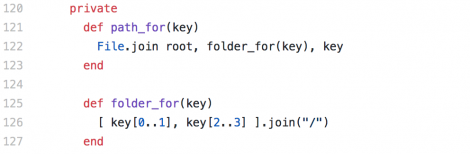
There’s code in the Paperclip migration guide to move the files if you so choose, but I left them in place.
Test skipped for us, but worthwhile if you’re moving files.
What you should be able to test so far:
- Pre-existing data should be viewable.
5. Test the data migration locally with acceptance or production data.
So, in an ideal world, you have confidence in your data migration, can push it up to acceptance and run it there and everything is fine. Instead I iterated on it several times and then refactored it to make it pretty. That’s a lot easier to do with real data and a lot easier to do while running it locally. If you have a great acceptance environment, then definitely pull down that database and run it. However, we only had good production data. I pulled down the database from Heroku, changed the local storage to point to the S3 production bucket, and ran the migration locally. Because we were not moving files, it was completely safe and non-destructive to do. It also helped me discover several bugs in the data migration code.
You can check through using the UI if the files are there. However, I checked first on the console to see if everything ran successfully. I would type on the console, candidate.resume to make sure it was an Active Storage object. Then I’d type candidate.resume.attached? to ensure the join table was properly joining both records.
One of the things I found I needed to change was the key. The key is how it retrieves the file and our keys were in our neat and tidy structure candidates/:name/:filename. So, I grabbed the path in order for it to retrieve those files without moving them. You may wish to do something different. The migration guide suggests moving them. In our case, it was not necessary.
What you should be able to test so far:
- Pre-existing data should be viewable. (DON’T MODIFY THINGS IF IT’S PRODUCTION!)
6. Test on acceptance/staging with external APIs.
We had one external API issue that wasn’t clarified for me until we put it up Heroku where it could interact. We use Wufoo to upload candidates to our system. Wufoo passes along a URL. When we were using Paperclip, we only had to parse the URL and assign it like so:
candidate.resume=(URI.parse(“https://someresume.com/resume.pdf”))
With ActiveStorage I thought the method would be like this:
candidate.resume.attach(URI.parse(“https://someresume.com/resume.pdf”))
NOPE!
That did not work. Instead, Active Storage needed an open I/O in order to attach the file. Modifying the code to this will work:
We deployed the code in two stages, as I mentioned in the article, with two separate commits. Our deploy was as follows:
- Merge the first branch with the migration and rake task onto staging.
- Migrate and run the rake task.
- Check that the files were created.
- Merge the second branch with the code conversion onto staging.
- Test that staging works.
- Revert the second commit (or force push remove it if you’re feeling lucky)
- Deploy staging.
- Migrate and run the rake task.
- Check that the files were created.
- Check that no further records were created since the deploy (or take down for maintenance first)
- Deploy the second branch with the code conversion onto staging.
- Deploy the second branch onto production.
- Perhaps at the end of this list you see why I felt like we were jumping between two trains in motion. It was certainly an *exciting* leap filled with lots of moving parts.
Active Storage has now been on production for us for over a week and it’s been seamless and issue free to our users. It did everything we needed, though there were certainly more things I wanted that weren’t yet there. I’m looking forward to seeing Active Storage evolve. This has been an interesting new piece of Rails tech.
** Another potential solution instead of deploying the code that changes the model after running the data migration is to include a model inside of the service that has the old code. This code would still rely on the Paperclip gem and the Paperclip configurations being in place, however, so I still see a need for two deploys in this case, one to migrate and change over and a second one to clean up.