
Replacing Component Lifecycle Methods with React Hooks
When writing React components, we sometimes need access to lifecycle events to handle a variety of side effects: fetching data on mount, sanitizing props when the component updates, cleaning up before the component unmounts, etc.
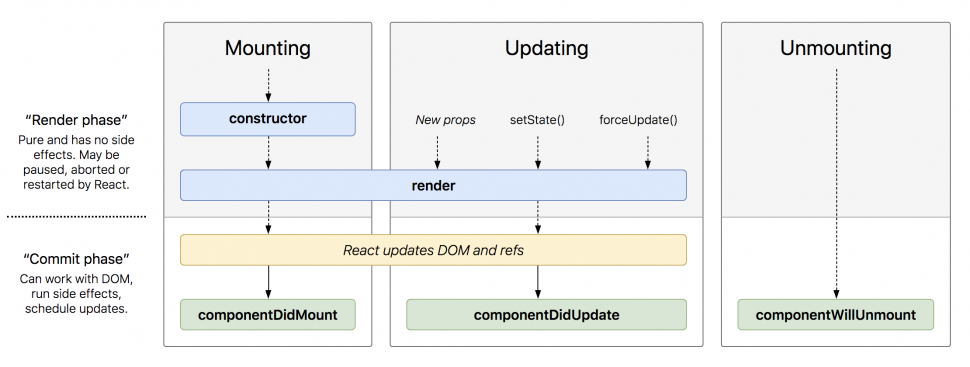
Until React 16.8, the most common solution for handling lifecycle events required ES6 class-based components. In other words, if our code was already written using functional React components, then we first would have to rewrite those components as classes that extend React.Component with a dedicated render function. Only then would it be possible to access the three most common lifecycle methods: componentDidMount, componentDidUpdate, and componentWillUnmount. (For the purposes of this article, we will only cover these three lifecycle methods. Since other lifecycle methods will be deprecated in React 17, and, in the interim, require the use of the UNSAFE_ prefix, we will not cover them in this post.) The following diagram illustrates when these methods are invoked in the context of the component lifecycle:
Although it seems like a small change, a fair amount of complexity is introduced when changing a functional React component to a class-based React component. First of all, this change introduces the cognitive overhead of using ES6 “classes”, which are generally confusing and have various implications on the minification of the React code. There is also a lack of code reusability that comes with using class-based components, since the lifecycle methods themselves must be a member of the class and cannot, therefore, be extracted. Additionally, since code cannot easily be shared between components, there is a tendency to fall into “Wrapper Hell” where components are deeply nested and hard to reason about. There must be a better way…
Enter React Hooks!
Hooks allow us to write functional React components and still be able to “hook” into all of the React.Component functionality, including lifecycle methods.
For each of the three lifecycle methods, let’s take a look at what a class-based approach looks like and how you can use Hooks to achieve the same result with a functional component.
componentDidMount
Before (class-based component):
import React from "react";

class Component extends React.Component {
  componentDidMount() {
    console.log("Behavior before the component is added to the DOM");
  }

  render() {
    return <h1>Hello World</h1>;
  }
};
After (functional component using Hooks):
import React, { useEffect } from "react";

const Component = () => {
  useEffect(() => {
    console.log("Behavior before the component is added to the DOM");
  }, []);

  return <h1>Hello World</h1>;
};
In the above example, the useEffect Hook will be invoked when the component mounts. Notice the empty array [] as the second argument — that informs the useEffect Hook that it only needs to execute once, when the component mounts.
componentDidUpdate
Before (class-based component):
import React from "react";

class Component extends React.Component {
  componentDidUpdate() {
    console.log("Behavior when the component receives new state or props.");
  }

  render() {
    return <h1>Hello World</h1>;
  }
};
After (functional component using Hooks):
import React, { useEffect } from "react";

const Component = () => {
  useEffect(() => {
    console.log("Behavior when the component receives new state or props.");
  });

  return <h1>Hello World</h1>;
};
Wait a minute. This looks very similar to how we handled componentDidMount. What is the difference? The most important thing to note is the optional second argument ([]) is no longer present. This means that the Hook will be evaluated on every re-render of the component. The optional second argument represents an array of dependency values that will trigger the re-evaluation of the useEffect Hook. If no values are provided in the array, it will only evaluate the Hook on mount. If the array itself is not provided, it will be evaluated every re-render.
To elaborate on this a bit more — if we wanted to add a gate to componentDidUpdate we might do something like this in a class-based component:
import React from "react";

class Component extends React.Component {
  componentDidUpdate(prevProps) {
        if (this.props.foo !== prevProps.foo) {
        console.log("Behavior when the value of 'foo' changes.");
        }
  }

  render() {
    return <h1>Hello World</h1>;
  }
};
This allows us to conditionally execute behavior based on the foo prop value changing. With Hooks, this becomes trivial:
import React, { useEffect } from "react";

const Component = ({ foo }) => {
  useEffect(() => {
    console.log("Behavior when the value of 'foo' changes.");
  }, [foo]);

  return <h1>Hello World</h1>;
};
The useEffect Hook will now only be evaluated if the value of foo changes since it is included in the option dependency array.
componentWillUnmount
Before (class-based component):
import React from "react";

class Component extends React.Component {
  componentWillUnmount() {
    console.log("Behavior right before the component is removed from the DOM.");
  }

  render() {
    return <h1>Hello World</h1>;
  }
};
After (functional component using Hooks):
import React, { useEffect } from "react";

const Component = () => {
  useEffect(() => {
    return () => {
            console.log("Behavior right before the component is removed from the DOM.");
        }
  }, []);

  return <h1>Hello World</h1>;
};
Wait another minute! This looks even more similar to how we handled componentDidMount! They are, in fact, very similar. The only difference is the return statement inside of the useEffect function body. If a function is returned from useEffect, that function is invoked only when the component is removed from the DOM.
Putting it all together
It’s easy to talk about each of these lifecycle methods in isolation, so let’s take a look at a simple example of how all of these lifecycle methods can be used together with Hooks:
import React, { useEffect } from "react";

const Component = () => {
  useEffect(() => {
    const intervalId = setInterval(() => {
      document.title = `Time is: ${new Date()}`;
    }, 1000);

    return () => {
      document.title = "Time stopped.";
      clearInterval(intervalId);
    }
  }, []);

  return <h1>What time is it?</h1>;
};
In the example above, the component updates the title of the page to be current time based on an interval set on component mount inside the Hook. Then, on unmount, the interval is cleared.
A live demo of the above code is available here.
Parting Thoughts
React Hooks provide a great deal of flexibility around implementing lifecycle methods. Unlike the class-based component approach, the Hooks lifecycle methods in a functional Hooks component allow the developer to decide how tightly or loosely coupled the lifecycle methods are. In the class-based approach, any setup that was done in componentDidMount would have to make values available to componentWillUnmount in order to clean up (i.e. the interval ID when calling setInterval). Using Hooks, there is no need to do this since the mounting and unmounting logic is enclosed inside the same function scope. Additionally, if there were a need to have separation between the mounting Hook and the unmounting Hook, the developer can opt to use two separate Hooks and handle the cases independently.
Even if writing class-based components doesn’t seem like a big deal, it’s hard to argue that switching contexts between class-based and functional React components is a delightful developer experience. Using React Hooks, it is possible to have the best of both worlds in a simple and reusable way.
Interested in more software development tips and insights? Visit the development section on our blog!
